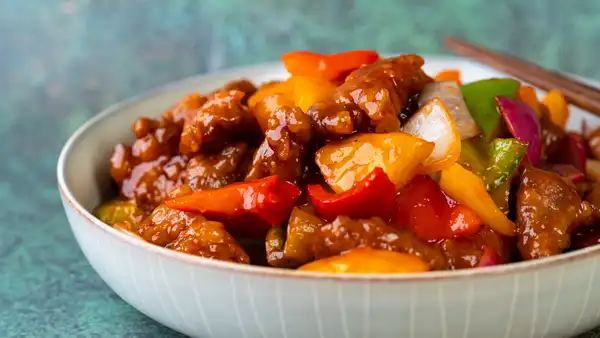
Sweet and Sour Pork (咕噜肉)

One of the world's most popular takeout dishes made right at home!

flodesk gif
Prep Time
20 min
Total Time
45 min
Yields
3 servings

A Recipe by Daddy Lau

My dad's been cooking Chinese food for over 50 years - as a kid fending for himself in Guangzhou, as the head chef of his own restaurant, and as a loving father in our home.

Hopefully, by learning this recipe, you'll get to experience some of the delicious joy we felt growing up eating his food!

- Randy

By my estimates, my dad has made sweet and sour pork thousands of times over his career. It's practically like breathing for him.

Sweet and sour pork (咕噜肉) sits among some of the most well-known Chinese dishes outside of China. It’s widely believed to be a Cantonese dish, known colloquially as gú lóuh yuhk, which roughly translates to “ancient pork.”

Some tales say the name comes from the “guh guh guh” sound people make as they gulp down the delicious bites of pork.

What's in sweet and sour sauce?

Our recipe calls for ketchup, brown sugar, vinegar, cornstarch, salt, and water. We recommend a homemade sweet and sour sauce instead of using premade packets as it's cheaper, more convenient (most, if not all, of these are pantry staples), more customizable, and probably healthier.

Ketchup in a Chinese dish? Yes!

One of the key ingredients in this sweet and sour pork recipe is ketchup. If you're like me, you might be thinking, “Why is ketchup being used in a traditional Chinese dish?”

So, I went down a rabbit hole and emerged with an appreciation for ketchup and sweet and sour pork as symbols of the many ways in which Eastern and Western cultures have influenced one another. It turns out ketchup has actually been used in quite a lot of traditional Chinese recipes, dating back to the 1900s.

Even though ketchup is now known as a tomato sauce that we throw onto burgers or French fries, we can trace the condiment back to 300 B.C as a Chinese fermented fish sauce.

It feel out of favor unti the 1600s to 1700s when fish sauce was revived in China by traders traveling along the coast between Guangdong and Fujian and Vietnam and Cambodia. In Hokkien, it was called kê-chiap, a name that stuck throughout Southeast Asia.

Around the same era, British traders in Southeast Asia became obsessed with their newly discovered “catchup,” and it quickly took storm as they brought it back to Britain. Initially, British traders made a ton of profit selling imported fish ketchup back at home. Soon after, Westerners started developing their own homegrown recipes for ketchup in order to avoid paying for imported sauce. As ketchup adapted to Western tastes, it gradually morphed into a mushroom-based sauce, then a sweeter tomato-based sauce popularized by companies like Heinz.

As China began importing tomato ketchup in the 1900s, many Chinese chefs started experimenting and incorporating ketchup into traditional sweet and sour dishes as an easier alternative to making the sauce base from scratch. And coming full-circle, as Chinese immigrants made their way to America and other countries, they brought dishes like sweet and sour pork with them.

Great reading:

Check out a quick story summary of our recipe!
Ingredients

Weight: US
oz
g
Volume: US
cup
mL
Servings
3

Main Ingredients

  • 10 oz pork shoulder butt
  • 1 oz red bell pepper (

    optional

    )
  • 1 oz yellow bell pepper (

    optional

    )
  • 1 oz green bell pepper (

    optional

    )
  • 1 oz red onion (

    optional

    )
  • 1 oz yellow onion (

    optional

    )
  • 4 oz pineapple (

    optional

    )
  • 0.50 lb corn oil (

    for frying

    )

Pork Marinade

  • 1 tsp garlic salt
  • 1 tbsp light soy sauce (

    Amazon

    )
  • 0.50 egg
  • 2 tbsp all-purpose flour
  • 3 tbsp cornstarch

Sweet and Sour Pork Sauce

  • 4 tbsp ketchup
  • 4 tbsp brown sugar
  • 3 tbsp vinegar
  • 1 tsp cornstarch
  • 0.50 tsp salt
  • 2 tbsp water

The best cuts to use for sweet and sour pork

We go into a lot of detail in our video, but the most common type of pork used is pork shoulder. Most restaurants use pork butt or pork shoulder for their tenderness and good fat ratio.

Pork belly and spare ribs are also great. Pork belly will taste the best because of its high fat content, but it's also the greasiest. Another fantastic and delicious cut is spare ribs! With a bone-in cut like spare ribs, the dish is going to be very tender and juicy.

You definitely want to avoid leaner cuts (like pork chop) if you're frying it.

How to make the crispiest, juiciest sweet and sour pork

Just like orange chicken, the technique we use to get sweet and sour pork crispy in the first place is the double fry method. We fry it once at a lower temperature to cook it through, then once more at a higher temperature to get the moisture out of the coating.

But as soon as you mix the fried pork into the sauce, that crust is going to start soaking in the liquid, so it's best to dig in as soon as it's done cooking!

Mommy Lau also suggests using an air fryer to reheat orange chicken and you can definitely try it with sweet and sour pork. It won't be as good as a fresh batch, but it may help regain some of the crunch.

On oils and smoke points

You should generally avoid olive oil for any cooking that involves higher heat. This is because olive oil has what’s called a lower smoke point, which is the temperature at which the oil stops shimmering or rippling and starts smoking.

Smoking oil isn’t always a problem and sometimes even desired for getting that perfect “wok hei” in your stir fry, but it’s a sign that the oil is breaking down, which can release burnt or bitter flavors or even harmful free radicals.

Here’s a chart that highlights the smoke points of a few of the most common cooking oils.

There are a few other factors that go into selecting oils like whether they’re neutral or flavored, refined or unrefined.

Most cooking oil is created by extracting and compressing seeds and nuts, and oils that are “unrefined,” “raw,” or “virgin” are usually bottled almost immediately. They generally have more nutrients, but a lower smoke point and shorter shelf life. Refined oils go through more processing for a higher smoke point, longer shelf life, and a more neutral flavor.

It’s not totally true that you should avoid olive oil since you can buy either refined or unrefined varieties. But for simplicity’s sake, for frying, you generally want to use neutral, refined oils like vegetable oil, refined olive oil, or corn oil. 

Finding Asian ingredients

Some of these ingredients may be hard to find in a typical grocery store.

If you don't live near an Asian market, most or all of what my dad uses in this recipe can be found on Amazon:​ ​ ​ ​ ​ ​ ​ ​ ​ ​ ​ ​ ​ ​ ​ ​ ​ ​ ​ ​ ​ ​ ​ ​ ​ ​ ​ ​ ​ ​ ​ ​ ​ ​ ​ ​ ​ ​ ​ ​ ​ ​ ​ ​ ​ ​ ​ ​ ​ ​ ​ ​ ​ ​ ​ ​ ​ ​ ​ ​ ​ ​ ​ ​ ​ ​ ​ ​ ​ ​ ​ ​ ​ ​ ​ ​ ​ ​ ​ ​ ​

These links are affiliate links, which means that if you use our links to purchase these ingredients, Amazon pays my family a small amount for the sale - at no extra cost to you. If you use these links, we really appreciate the support!

Other supplies and tools

You'll need a good wok, which provides a ton of versatility for the classic Chinese cooking methods: steaming, stir frying, deep frying, etc.

You may want an instant read thermometer to help you get precise with how you're deep frying. Here are two great options:

First, we'll cut to divide our pork (10 oz) into a few pieces, parallel to the grain. Then, we'll slice pieces perpendicular to the grain, into about 1/4 to 1/2 inch pieces.

Add garlic salt (1 tsp), light soy sauce (1 tbsp), and mix and massage with the pork slices for about 1 minute.

Then, we'll crack, beat, and pour the egg (0.50 )​ into the bowl, and mix and massage for another 30 seconds.

Let the pork marinate while we prepare the rest of our ingredients.

These are all basically optional, but we'll cut our bell peppers (red bell peppers (1 oz), yellow bell peppers (1 oz), green bell peppers (1 oz)) and red onions (1 oz), yellow onions (1 oz) into small triangles.

We'll also cut some pineapple slices (4 oz) into bite-sized pieces.

We'll make our sauce with ketchup (4 tbsp), brown sugar (4 tbsp), vinegar (3 tbsp), cornstarch (1 tsp), salt (0.50 tsp), and water (2 tbsp). Mix it thoroughly for about 45 to 60 seconds.

Add flour (2 tbsp) to the marinated pork and massage for about 1 to 2 minutes to coat the pork evenly in the flour. You may need to add dashes of water to help spread the flour around.

Add cornstarch (3 tbsp) to a plate, and coat each piece of pork with it. Squeeze each pork piece a few times to help cover each piece.

As with our Honey Walnut Shrimp and General Tso's Chicken recipes, we'll be frying our pork twice, the first time to cook it and a second to bring out the crunchiness.

We'll fill our wok with enough corn oil (0.50 lb) to submerge the pork pieces. Set the stove on high heat and wait for the oil to heat up.

Fry #1

Heat the oil to 300° to 350°F / 149° to 176°C. Carefully transfer the pork into the wok and fry for 7 to 8 minutes. As you transfer, squeeze the pork to help the flour stick more.

Leave the pork alone for 1 to 2 minutes, because disturbing it will cause the flour and cornstarch to come loose. Transfer the pork out with a slotted spoon once the pork starts browning and crisping.

Fry #2

For the second fry, heat the oil to 400°F / 204°C and fry for 1 to 2 minutes. Transfer the pork out with a slotted spoon.

Chef's Tip: To test if the oil is hot enough, you can try dropping a small piece of a vegetable (like our bell peppers) into the oil. If it starts bubbling immediately, then the oil is hot enough.

If you want to be more precise, you can also use an instant-read thermometer to monitor the oil temperature throughout the frying process.

Another way to monitor the temperature is with an instant-read thermometer. If you don’t have one, here are two great options:

We're close to being done!

After frying, empty the oil from the wok to save for future cooking.

Then, we'll combine everything in the wok in a few stages:

  • Add the chopped vegetables and cook for 30 seconds.
  • Add the pineapple slices and cook for another 30 seconds.
  • Transfer the veggies and pineapples out of the wok.
  • Add some corn oil and start reducing the sauce for 1 to 2 minutes, until boiling.
  • Throw everything (pork, veggies, pineapples) back into the wok. Mix around with the sauce for 1 to 2 minutes.

Transfer onto a plate and enjoy immediately to maximize the crunchiness!

FAQ

What are good substitutes for pork in sweet and sour pork?

  • If you don't eat pork, you can switch it out for chicken! Sweet and sour chicken is also a popular menu item at restaurants. Dark meat will probably hold up best, but as long as you're careful to not overcook it, you can definitely make it with chicken breast as well. Or, you can make a vegetarian version with tofu!

Is there a vegetarian sweet and sour dish?

  • Yes! You can use our recipe to make sweet and sour firm tofu. Coat the firm tofu with the cornstarch and flour mixture before deep frying, and stir fry with the other veggies as in the original recipe. Just be a touch more gentle to avoid breaking the tofu too much. You could also boil the firm tofu before coating it, as we do in our salt and pepper tofu dish.

How do you make sweet and sour pork red?

  • Restaurants often put a drop of red food coloring to brighten up the color of the dish. You can add this when mixing the sauce. If you don't mind a more natural color, the sauce will get its color from the ketchup and brown sugar.

Do you have to deep fry sweet and sour pork?

  • To get the characteristic crunch, deep frying, and specifically double frying, is essential. If you're willing to sacrifice that texture, you can definitely bake it, pan fry it, or stir fry it. The taste will be the same, because you'll be using the same ingredients, but it won't be as crispy and crunchy, and as my parents say, it'll be less aromatic.

Why is my sweet and sour pork tough and dry?

  • When cooking pork, lean meat is more likely to be tough. Tenderness comes from two places: the fattiness of the meat itself and the way you cut it. Choose a cut of pork with some fat, like pork butt or pork belly. Don't use lean cuts like pork chops. Then, when you're slicing it, make sure you're slicing it against the grain.
  • Meat becomes dry when it's overcooked. So don't overcook it! Our crispy pork gets its texture from double frying it. The first fry cooks it through, the second fry makes the crust crispy. Then after both frying sessions, it's stir fried with the sauce and vegetables. Keep in mind that it's going onto the heat three times to avoid overcooking it.

Summary

Sweet and Sour Pork (咕噜肉)
One of the world's most popular takeout dishes made right at home!
  • Prep Time: 20 min
  • Total Time: 45 min
  • Yield: 3 servings

Main Ingredients

  • 10 oz pork shoulder butt
  • 1 oz red bell pepper (

    optional

    )
  • 1 oz yellow bell pepper (

    optional

    )
  • 1 oz green bell pepper (

    optional

    )
  • 1 oz red onion (

    optional

    )
  • 1 oz yellow onion (

    optional

    )
  • 4 oz pineapple (

    optional

    )
  • 0.50 lb corn oil (

    for frying

    )

Pork Marinade

  • 1 tsp garlic salt
  • 1 tbsp light soy sauce (

    Amazon

    )
  • 0.50 egg
  • 2 tbsp all-purpose flour
  • 3 tbsp cornstarch

Sweet and Sour Pork Sauce

  • 4 tbsp ketchup
  • 4 tbsp brown sugar
  • 3 tbsp vinegar
  • 1 tsp cornstarch
  • 0.50 tsp salt
  • 2 tbsp water

Step 1 - Cut and marinate pork

↑ Jump to details

Cut to divide the pork (10 oz) into a few pieces, parallel to the grain. Then, slice pieces perpendicular to the grain, into about 1/4 to 1/2-inch pieces.

Add garlic salt (1 tsp), light soy sauce (1 tbsp), and mix and massage with the pork slices for about 1 minute.

Then, crack, beat, and pour the egg (0.50 )​ into the bowl, and mix and massage for another 30 seconds.

Let the pork marinate.

Step 2 - Cut vegetables and pineapples

↑ Jump to details

These are all basically optional, but cut the bell peppers into triangles (red bell peppers (1 oz), yellow bell peppers (1 oz), green bell peppers (1 oz)), and red onions (1 oz), yellow onions (1 oz) into small pieces.

Cut pineapple slices (4 oz) into bite-sized pieces.

Step 3 - Prepare sauce

↑ Jump to details

Make the sauce with ketchup (4 tbsp), brown sugar (4 tbsp), vinegar (3 tbsp), cornstarch (1 tsp), salt (0.50 tsp), and water (2 tbsp). Mix it thoroughly for about 45 to 60 seconds.

Step 4 - Coat pork in flour

↑ Jump to details

Add flour (2 tbsp) to the marinated pork and massage for about 1 to 2 minutes to coat the pork evenly in the flour. You may need to add dashes of water to help spread the flour around.

Add cornstarch (3 tbsp) to a plate, and coat each piece of pork with it. Squeeze each pork piece a few times to help cover each piece.

Step 5 - Fry pork

↑ Jump to details

Fill your wok with enough corn oil (0.50 lb) to submerge the pork pieces. Set the stove on high heat and wait for the oil to heat up.

Fry #1

Heat the oil to 300° to 350°F / 149° to 176°C. Carefully transfer the pork into the wok and fry for 7 to 8 minutes. As you transfer, squeeze the pork to help the flour stick more.

Leave the pork alone for 1 to 2 minutes, because disturbing it will cause the flour and cornstarch to come loose. Transfer the pork out with a slotted spoon once the pork starts browning and crisping.

Fry #2

For the second fry, heat the oil to 400°F / 204°C and fry for 1 to 2 minutes. Transfer the pork out with a slotted spoon.

Step 6 - Cook other ingredients, add sauce and mix

↑ Jump to details

After frying, empty the oil from the wok to save for future cooking.

Then, combine everything in the wok in a few stages:

  • Add the chopped vegetables and cook for 30 seconds.
  • Add the pineapple slices and cook for another 30 seconds.
  • Transfer the veggies and pineapples out of the wok.
  • Add some corn oil, and start reducing the sauce for 1 to 2 minutes, until boiling.
  • Throw everything (pork, veggies, pineapples) back into the wok. Mix around with the sauce for 1 to 2 minutes.

Transfer onto a plate and enjoy immediately to maximize the crunchiness!

Step 7 - Take pictures
Whip out your camera (1). Begin taking photos (1,000,000). Pick your favorites!
Step 8 - Share and tag us on Instagram @madewithlau #madewithlau!
Did you have fun making this recipe? We'd love to see & hear about it. (Especially my dad. He would be THRILLED!)

Enjoy!

We have many, many happy memories of enjoying this dish growing up.

Now, hopefully, you can create your own memories with this dish with your loved ones.

Also, I cordially invite you to eat with us and learn more about the dish, Chinese culture, and my family.

Cheers, and thanks for cooking with us!

Feel free to comment below if you have any questions about the recipe.